Tuesday, July 31, 2012

Taste the Rainbow!

So last night I busted out all of the Lime Crime colors(well all but Milky Ways) and decided I wanted to do a gradient.  I think I really like how it all came out.


I used the technique where you get a makeup sponge and put a one line of color on one side and another on the other then you just dab the color on.  If you do try this with these colors it took about three to four rounds on each nail for me to get the majority of it opaque.  All and all though they blended together very easily; you just have to watch out because you might have it perfect then you touch it one more time with the sponge and it rips it all off.

This turned out really nice, it is very pastel, bright, and summery to me.  In fact it could almost be Eastery nails if that’s the sort of thing you’re looking for…maybe add some Easter eggs.


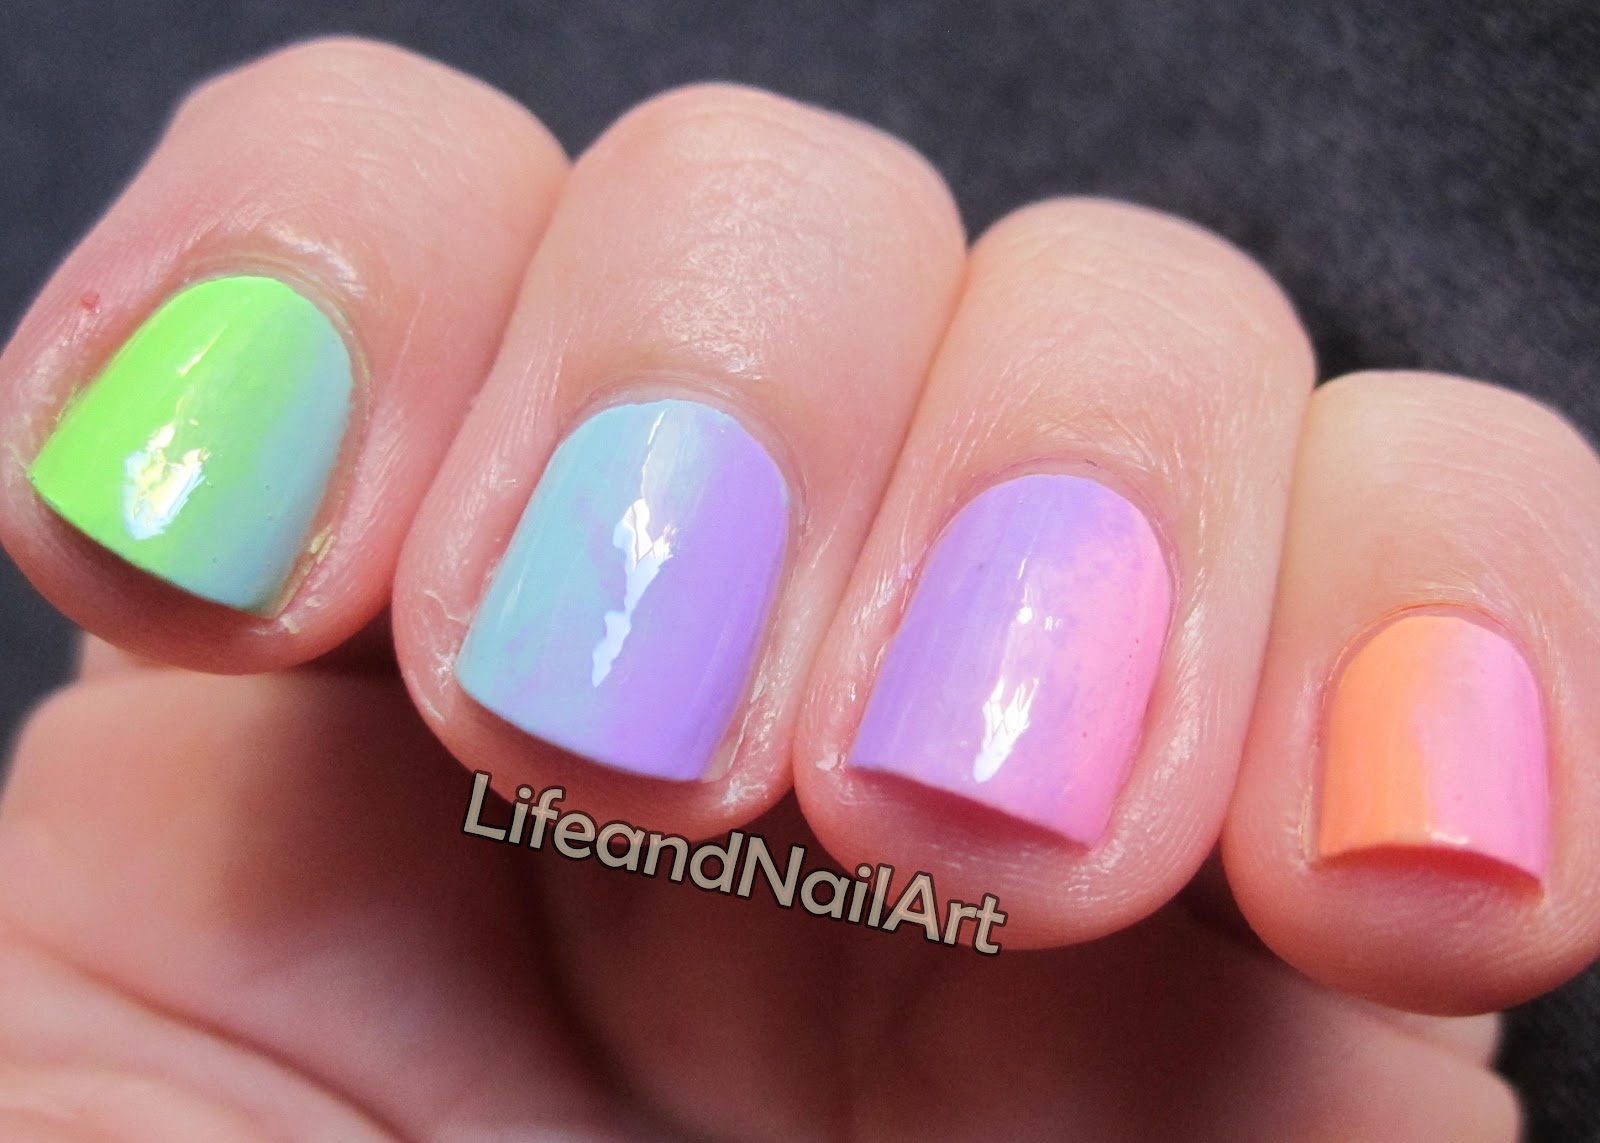
 Ignore my ugly cuticles...bleh, this weather has runined them.

One thing to note when you do a gradient it is a mess to clean up and some of these colors just did not want to come off no matter how much acetone I scrubbed on there.  The Lime Crime colors though are very pretty and fun to play with.

Anyway the baby is awake so off I go until next time!
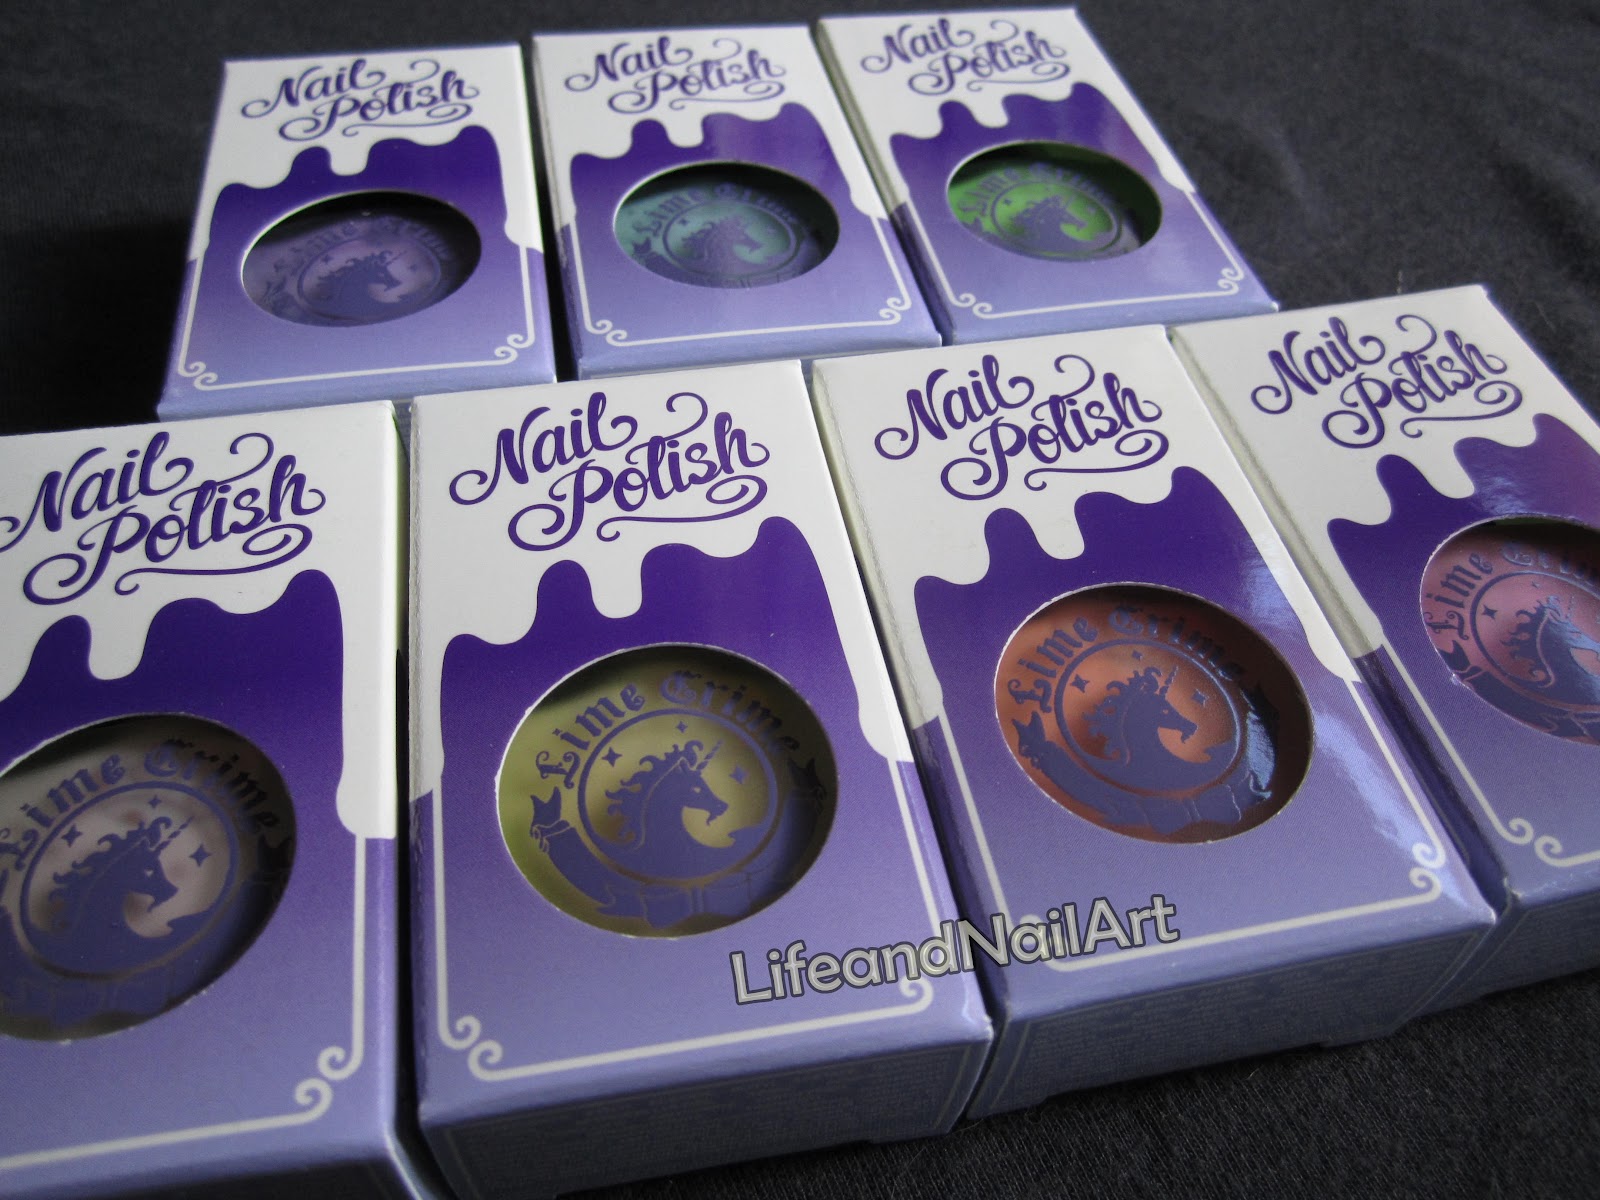
Polishes: All Lime Crime
Pastelchio, Peaches<3Cream, Crema De Limon, Lavendairy, Once in a Blue Mousse, and Parfait Day

Sunday, July 29, 2012

Pastelchio

OMG it has been forever since I last blogged!  So sorry but I have been beyond busy especially since I’m going back to work super soon.  BUT since it’s been so long I do have a bunch of nails saved up that I need to post soooo on with show...

Lookie what I got in the mail! Lime Crime!  It took maybe a week after I ordered it for it to arrive so it was pretty speedy service.

This is how it looked as I unboxed it!  So exciting!
It was in beautiful packaging; I just love how it came.  They were much smaller than I anticipated though, even though the web site did say 9 ml/.3 oz compared to the standard 15ml/.5 oz so I was surprised in that aspect. 
Here is a comparison of the Lime Crime bottle to a China Glaze bottle.
In the picture above is Lime Crime Peaches Cream and China Glaze Sun Worshipper
So far I have only worn one of the colors and that is Pastelchio, so here is a little swatch of that color on my nails.
I really like the way the end color looked.  It’s a very creamy bright green and it took three coats in this picture to achieve opaqueness.  The formula can be a tiny bit thick compared to other polishes to a point where as I pulled the brush out of the bottle it was stringy.  In the photos I did add a top coat to give it it's glossy finish.
Things to point out about this polish: it can be difficult to put on a nice thin coat at times but once it’s on, it is beautiful.  Also, I tried several of the colors for stamping and could not get it to work.  Now then again, maybe someone whose been stamping longer than I could, I’m not really sure.  It either would not pick up on the stamp or would only pick up a partial print.  I might try it again but after 45 minutes of attempting with several different colors I had to take a break.
Anyway, I hope you think this color is as beautiful as I did and I plan to post all week so stay tuned!

Monday, July 23, 2012

Matt and Dots


I had a whole different post planned but then I just finished my nails today and loved them so much that this post had to come first. 
I see all the matt nails that everyone posts on their blog and I decided that I must jump on this band wagon!

These might be my favorite nails so far.  I very first saw the gradient dot manicure on chalkboard nails blog here(btw she is one of my favorites!)  So I decided that I would have a go at it and I think it came out beautifully.  I choose a matt base its China Glaze’s Stone Cold from the Hunger Games Collection.  It’s very thick to apply and dries relatively fast and matt.  It happens to be the only matt nail polish I have in my collection but it is pretty dang awesome. 


So after I did this last night I wanted to do shiny things on top of it with my stamp set but no matter what I did none of the colors I actually wanted were working so I slept on it.  This morning I woke up renewed and ready to make some art. 
I decided to try my skills at gradient dotting and I think it came out great!  For all you people out there who think you need to purchase dotting tools to actually do this that is not the case.  I used a simple bobby pin and the bottom of a paint brush and I think this came out perfectly. 


Anyway thanks for reading I really do LOVE these nails, if you feel like it follow me or leave me a comment and tell me what you think J
 Polishes:
China Glaze Stone Cold(Sparkly Grey Matt)
Sally Hansen Insta-Dri Speedy Sunburst(Pinky Coral)
Icing Little Blue Box(Tealy Blueish Greeny, very hard to see the true color in the pictures)
Julep Susie(White Baby Blue)

Friday, July 20, 2012

Fugly Friday (water marbling)


This will be quick because I have to be out the door soon and still have yet to dress myself and my son appropriately.  Today is Fugly Friday!  Last night I attempted to do my very first water marble and after an hour and thirty minutes and one and a half hands done, I said screw it and wiped it off.  BUT not before taking some pictures of this failure.

In this picture I did no clean up, because I knew I was going to take it off anyway so excuse the nasty edges.

I’m going to have to work on this skill because I’ve seen some breathtaking pictures of different individual’s water marble and I really want it to work out.  I just kept getting water bubbles under the polish, or the paint would bleed down my whole nail; it was still a fun thing to attempt though.

Anyway until next time, I have a very pretty stamping job on my nails currently and can’t wait to show you.

Polishes:
China Glaze Frostbite
Zoya Zuza
Sally Hansen Smooth and Perfect Satin

Wednesday, July 18, 2012

Marbled


Marbled nails!  Some people call this watercolor nails or an alternative to water marbled nails, I just think it looks marbled so that's what I'm calling it.  I saw this done on polishandpearls.com and I thought it was super neat so I had to give it a try.  If you’d like to see a tutorial for this on her blog click HERE.
natural light

artificial light

I think this came out pretty awesomely, and it was a really easy nail art to do.  I was able to do a nail then mess with my son, without worrying about it getting it all messed up since it looks messy to begin with.   Plus this was a good break from glitter polish. 

So I just ordered some new polish from Lime Crime, a whole set to be exact, and I cannot wait for it to get here.  I’ll be sure to let y’all know when it arrives J!  I will be busy the next few days so I’m not sure if I’ll be able to post but will defiantly try.  Until next time!

Update:  I don't know what came over me but I totally forgot the nail polish names! Here they are...

Polishes:
Wet N Wild French White Creme
Icing In Love
Zoya Carly
Zoya Zuza

Tuesday, July 17, 2012

Supernova


A new day a new color! As promised yesterday I tried another Revlon Moon Candy, this one is Supernova.  I'm getting better at the art of flaky glitter application I think. 


artificial light

natural light

The grey base coat was perfect just like on the Galactic nail polish, one coat to amazingness.  The glitter was just like the other bottle but I really do think I have figured out how to put it on.  I kinda would lay the brush on one side of the nail then roll it over the other side and it would apply it pretty well. 

 After looking at it all night and part of today I might have put a little too much on my nails.  This color is different; unlike Galactic I feel it looks more beautiful in artificial light than in natural.  After wearing both I prefer Galactic to Supernova.

I have one more Moon Candy left to try and although I do love the way sparkly, glittery, and flaky polishes look they are a pain in the butt to remove(that's why this one is still currently on my nails :)).  So I might take a break from the glitter for my next post.  But if you really want to see it let me know!

Monday, July 16, 2012

Galactic

I told you yesterday that I was going to try out the new Revlon Moon Candy and I have to say it looks pretty awesomesauce!

lamp light 

natural light


This is how my nails came out, in the sunlight there beauty really shines the flaky glitter catches the light and just sparkles beautifully.  If you look at the two different pictures the polish looks drastically different between artificial light and natural light.

There is one problem with this nail polish the glittery part was a PAIN to apply.  The base coat went on perfectly; one coat was practically opaque it was just the glitter end that was my problem.  Now granted I may not have the best glitter/flaky polish skills but the fact that I had to focus every ounce of my attention on keeping the stuff on my brush made it a difficult process.   I don’t know maybe I just need to use this kind of polish more to see if it is me or the polish.  Tonight I plan on trying another Moon Candy so we will see how that goes.

All negatives aside I would defiantly use this again because I love the way the manicure looks on my nails its chunky, sparkly, and just plain fun.  Anyway any comments or questions are welcome, thanks for reading!
Polish:
Revlon Moon Candy Galactic

Sunday, July 15, 2012

Watermelons

So I told you yesterday I got my Zoya Surf Collection and it was SOOO exciting!  Well then I went to Walgreens today and couldn't help myself I had to buy some other polishes that I really wanted to try out(I definatly needed more glitter anyway!)

Here's my haul(Zoyas included):


The Revlon double sided ones look like a whole lot of fun and can't wait to show you pictures of how those come out.
Anyway once I saw my new polish I got inspired to do something fun and summery.

natural light(left)

 These are some awesome watermelons.

natural light(right)

On my right hand I just did accent nails because I'm still working on getting better at using my bad hand.  My nails really make me have the urge to go on a picnic or visit a county fair, ha ha!  Anyway tomorrow I'll try out one of those double ended Revlons cause they look so awesome!

Polishes:
Zoya Meg
Zoya Kimber


Saturday, July 14, 2012

Galaxy

I have been wanting to do some galaxy nails for while now and I finally got the opportunity(meaning time) to do them!

lamp light(left hand)

On my left hand I put some chunky glitter polish on my pointer finger, didn't really like it much.  On my ring finger I had a micro glittery Pixel polish(Oh Golly Gee!) I picked up on a whim.  I liked it but it was too reflective to actually see the beauty of my amazing art skills.

lamp light(right hand)

On my right hand I went with no extra glitter or anything and even though that was my more difficult hand it actually came out better. I really like how this whole manicure looks, it was my first time to attempt sponging with tweezers and tiny sponges.

 natural light(left hand)

 I would happily do this again, I just wish I wasn't such a picker and could have worn it longer then three days :(.  Three days is pretty much my max, in fact if I see a chip I immediatly start picking at it. 

 Well I got a delivery today and it was my Zoya Surf Collection so YAYAYAYA!  Can't wait to use them they will be super awesome it's my first Zoya set!  Anyway until next time!


Polishes Used:

China Glaze Sun-Kissed
China Glaze Frostbite
Sally Hansen Xtreme Wear Black Out
Sally Hansen Complete Salon Manicure Back to the Fuchsia
Wet N Wild French White Creme


Thursday, July 12, 2012

Tealish

So I've been super busy these past couple of days.  I have been cleaning up an old house and it has been raining cats and dogs for the past four days. 

Plus during all that I have been reveling in my guilty pleasure "Pretty Little Liars", a netflix marathon of it.  The funny thing is half the time I stare at the fact that the girls in it have there fingernails done in multiple shades during each episode.  And I think where do they find the time during all their mystery solving, when I can barley find time and I just take care of my son.  But I digress it is just a T.V. show and Erik(my son) will be seven months tomorrow so YAY!

Anyway onto the nails.

natural light


I actually did a swatch!  I don't normally do that but I picked up this color and it was so pretty that I wanted to keep them plain jane for a bit.  The polish is Wet N Wild's I Need a Refresh-Mint, which I have heard is a dupe of China Glaze's For Audrey.  Sadly I don't have the polish so I can't show to see if it's actually true. 

I also did my cuticles for the first time ever, what do ya think?  I think they came out pretty freakin awesomeness; usually when I look at other peoples blogs I'm like I wish I had there cuticles but now mine are so nice.

Anyway after wearing this for a few days I was like lets add some details.

natural light

This was really fun to do but my top coat kinda screwed up the purple on my index.  The colors are L'Oreal Tweet Me(yellow), China Glaze I'm with the Lifeguard(green), China Glaze Surfin' for the Boys(coraly redish),and China Glaze Sun Worshipper(orange).  The black and purple are those nail art pens I got at Claire's they have no name :(.  I'll be busy all day tomorrow but hopefully tomorrow night I can post, I did some Galaxy nails and they are so cute.  Anyway until next time!

Tuesday, July 10, 2012

Orangyish

This weekend I bought a whole bunch of new nail polish; I ordered the Zoya Surf Collection it's going to be awesomeness(plus I got the set for just $24!!!!)  We dropped into Claire's where I picked up this little gizmo.


I've been wanting a striper so a snagged this(I got a purple one too).  Actually it was not only a striper but a pen as well so it turned out to be a really neat new toy.


Here are my nails, ignore my pinkie it's awful.  The base coat is Hot Hue from the Revlon Nail Art Neons.  By the way if you purchase this it's a double ended polish that comes with a bright neon color and a white base.  You're supposed to paint a coat of the white then the neon so it stands out.  Well I did that to begin with and it was such a streaky mess that I took it all off and just stuck with the neon color.


On this hand I was gonna attempt to do a mirror of what I did on my left but my husband got all excited and wanted to do his own thing so I was like why not. 

In the end I really like the nail art pen/brush I got, it actually worked out really well and I can not wait to do more ideas with it.

Monday, July 9, 2012

Watercolor (Ugly Friday)

So I planned this blog post for Friday but my husband got off work super early so we were out and about pretty much the whole weekend.

There are times when I do my nails and I'm like "Wow, that idea just does not work...." and I pull out the acetone and scub my poor nails clean and begin again.  Instead of that being just a bunch of wasted time, I decided I would TRY(key word here) to have ugly nail Fridays where I post my ugly nasty manicures that I particularly don't like.

One day while perusing my blogs, I saw this super neat manicure that people were calling watercolor nails; it kinda looks like they are watercolored duh.  So I was like ok lets give it a go.

lamp light

So here they are; my husband shouted in horror at the sight of my nails.  While I was taking the time to tediously perfect these, I hated them.  I just couldn't seem to get them the way I wanted them to be.  Now I did end up wearing these allll weekend and they did grww on me.  My mom looked at them and thought they were the best nails yet so to each his own.

natural light(kinda blurry)

flash


I do think that I MAY do this manicure again; near the end I felt like I was getting it more the way I wanted it to be.

Polishes:
NYC French White Tip
China Glaze Sun Worshiper
China Glaze Sun-Kissed
China Glaze Surfin' for Boys
China Glaze Ride the Waves
 A England Avalon

Anyway, anyone actually like the way this turned out?  Hopefully my son won't be crazy (he has started crawling and gets into everything.)  and I'll be able to post every day this week! Until next time!


Thursday, July 5, 2012

Tweet Me

This is going to be a quickie cause I think my son is waking up as I speak.

So instead of going all out and doing fourth of July nails like everyone else.  I kept my nails the way they were when I did my last mani because I loved it so much.


This is in natural light the base color is L'Oreal Tweet Me.  I ADORE it.  It took three or four coats to opaque but it really is a pretty yellow.  Plus it had a shimmer about it that is just awesomesauce.  The stamp color is Sally Hansen Insta-Dri Co-Bolt Blue and the stamp is BM-208.


Here's a picture with flash, I really can't get enough of they way these nails came out.  Stamping is getting more and more fun to me and I want to buy the new Cheeky 2012 plates so I can just go crazy with the stamping.  Alrighty until next time!

Wednesday, July 4, 2012

Julep Maven

I was planning on posting this yesterday, but Erik(my son) was in an extra bad mood so it was a no go. 

Anyway as I said last time I got my Julep Maven box on Saturday which was extremely exciting.  For those of you who don't know what a "Julep Maven Box" is, it's a monthly service where you pay $19.99 a month and they send you a lovely box that has nail polish and other beauty products in it.  I actually got my very first box for .01 cent, it had two polishes a nice foot creme to make your feetsies nice and smooth.  The July box was very nice (I'm killing my computer right now cause its moving 9gigs of pictures and trying to make a blog post.)


This is what the box looks like when it comes in the mail.  Its tiny and cute, it makes you all excited!


This is what was inside when I opened it.  I left out the card that introduces the box to you, but that's not really necessary.  July's box came with THREE nail polishes (usually it's only two.)  A lip gloss, a coupon for one free polish, and atomic red hots.  It was pretty awesome.


From left to right the polishes are America, Frieda, and Audrey.  The box came with its little introduction card but on the back of it it had a manicure idea for you to do with the nail polish they sent.  So I was like why not give it a go.


First I did a basecoat of Audrey, it's very translucent this was three coats and you could still my nail line underneath.  It doesn't really matter though because for the mani I painted Frieda on the tips.


This is the final product.  I think it came out nicely if you were doing it for say maybe a Valentine nail.  I free handed the tips, I'm quite proud of that fact.  Anyway until next time.

Monday, July 2, 2012

America

This is just a quickie post because my son and I went to the zoo today, that was slightly exhausting.  Plus my husband is on his way home to take me out to dinner so YAYZOR!

I got my Julep Maven box on Saturday, it by the way is one of the most exciting things about my month.  I'll talk more about that in my next post.  Anyway it came with a suprise polish called America.  It's a very glittery glitter with lots of red mini glitter, medium sized blue chunks, and the awesomest silver stars.  So I slapped it on my right hand, I really do mean slapped it on.


I had the base coats from my Justice League colors on this hand and just put it over it.  The thumb and index are America over red, the middle is over black, ring is over blue, and pinky is over green which kinda looks like blah.  I plan to do a fourth of July inspired nails with this so hopefully that won't look so crazy.  OH and here's a picture with the actual bottle.


Sunday, July 1, 2012

Superheroes!

Yesterday I decided it was time to try out doing REAL hand painted nail art.  I dug through my pile of nail polishes and found all the colors I would need. 

Before I get to the actual nails (I know that's all yall really want to see anyway.)  My husband and I have been playing LEGO Batman 2, which is extremely fun by the way.  So I was like lets see if I can do a Justice League nail art.  I know, I know. everyone and there brother is doing superhero nail art.  But this is my first free hand so it just had to be Justice League.


I actually think it came out pretty nice and clean this is a picture with flash.


This is without flash in natural light (my favorite is the Robin symbol).


Anyway if you didn't already know, starting with the thumb is Wonder Woman, index is Robin, Batman, Superman, and ending with the Green Lantern for the pinky.

My red is Sally Hansen Insta-Dri Rapid Red, the Yellow is China Glaze Sun-Kissed, the Blue is China Glaze Ride the Waves, the Green is I'm with the Lifeguard, the Black is Sally Hansen Xtreme Wear Black Out, and finally my White is NYC French White Tip.

Hopefully, I will start updating almost everday.  Also anyone who reads this, I'm trying to figure out how to add a way for people to follow me and, for the life of me, can not figure out how to add Google friend Connect since it's been deactivated.  So any pointers would be awesome.  Thanks y'all!